
Since the Threadripper series was launched, very few companies managed to offer a full sized contact plate that can cover the whole IHS from the CPU. Silverstone not only offers that with their new IceGem series, but also an aesthetics design to die for. Coupled with some pressure optimized ARGB fans and a three phase, six pole design for the pump, this AIO promises to be a real success !

SilverStone Technology Co., Ltd is a company based in Taiwan, founded in 2003 that makes computer cases, power supplies, and other peripheral for personal computers. Their goal was to provide products that create inspirations and customers a wide selection of choices.
With distribution centres in different areas of the globe, SilverStone products can be seen all over the world, not just for computer users but also for home entertainment use. Thus providing leisure with integration of advanced technologies that is functional and making them enjoyable to use.
Prices and Availability
The IceGem family from SilverStone consists of the three most popular formats for AIOs, the 240, 280 and 360 mm. Our test sample for today is the top dog, the 360 mm variant. Considering that the IceGem supports even the big Threadripper sockets as in, it has a full sized contact plate as well, its priced reasonably good.
*18/04/2021 Update - The video review is live as well!*
Presentation and Specifications
* Courtesy of their website.
360mm high-performance ARGB AIO liquid cooler with 3 x 120mm ARGB fans
■ Full block coverage to entirely cover the IHS of Ryzen Threadripper processor
■ Pressure optimized fans with brighter ARGB effects can effectively dissipate heat from the radiator
■ Scintillating diamond-cut design with SilverStone logo plating
■ Integrated addressable RGB lighting for water block and fans
■ Includes addressable RGB controller with 10 lighting modes and ability to adjust brightness and color changing speeds
■ The pump motor utilizes three phase, six pole design for smoother, quieter operation compared to most single phase, four pole design. Energy efficiency also improves as well
■ Compatible with Intel LGA 115X/1366/1200/2011/2066 and AMD sTRX4/TR4/AM4/AM3/AM2/FM2/FM1 sockets
The pump motor utilizes three phase, six pole design for smoother, quieter operation compared to most single phase, four pole design. Energy efficiency also improves as well.
Visual Inspection
The AIO comes shipped in a simple yet effective themed packaging design, with a visual depiction of the actual product in the middle. Then it makes it very obvious that it fully supports RGB from all of the main motherboard vendors.
On the back, from left to right, we have the list of the main specs, the overall dimension for the rad & pump and then some of the main highlights.
This side just continues the list regarding the features of the IceGem 360 AIO.
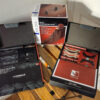
Inside, everything is nicely stored and the rad has its own carboard shell for extra protection for the fins.
Let’s start with the accessories. Everything you need is present in one zip-lock bag and each socket has its own unique bag.
Now let’s zoom into these and thus we have:
* 1x Universal Intel/AMD backplate
* 1x AMD SP3/xTR4/TR4 mounting bracket
* 1x AMD AM3/AM4 mounting bracket
* 1x Intel mounting bracket (pre-installed on the pump)
* 5x Black washers
* 4x Black spacers
* 4x Spring-loaded thumb screws
* 4x Intel/AMD long screws
* 4x Intel LGA20xx standoffs
* 4x AMD SP3/XTR4/TR4 standoffs
* 1x Mini SilverStone thermal paste tube
* 12x Long Phillips screws for the fans
* 12x Small Philips screws for the radiator
* 1x Single sided spacer for Intel/AMD sockets
* 1x 3-pin ARGB standard connector
* 1x 2-pin SATA powered connector
* 1x 4-pin PWM Y-splitter cable
* 1x Molex powered 2-pin adapter (to connect the pump directly to the PSU)
* 1x Mini remote/controller
Basically SilverStone made sure that you can enjoy the RGB even if you don’t have an available 5v RGB header. That’s why the remote saves the day.
Speaking of, this has 3 buttons on it. The M switches between the modes while the + and - buttons control the speed of the effects and brightness levels. There’s even an LED on the controller that indicates the following:
- Green, press +/– to adjust the lighting effects
- Red, press +/– to adjust the speed
- Blue, press +/– to adjust the brightness
- Yellow, then the lighting effect is on auto, making the + and – non-functional.
Now let’s move our attention to the 3 included ARGB 120 mm fans. These are rated up to 2200 RPM which allows them to displace airflow up to 93.4 CFM with a static pressure of 3.18mm/H2o.
These specs are achieved with the help of the 11 translucent blades which are designed to maximize airflow.
They claim under 36.6 dBA when it comes to the noise output.
Each fan has a pair of wires that come out of its rotor. One is the 50 cm long 4-pin PWM power connector while the other cable has a combo of 80cm + 29cm in length because of its 4-pin proprietary connector and a 3-pin ARGB port.
Now let’s inspect the radiator which is made from aluminium and has a very sleek design. Its exact dimension are 394 x 120 x 28mm (L x W x D). If we take the thickness (28mm) and add it to the value of the fans (25mm), make sure you have space for ~ 53 mm.
Zooming in, you will notice that the rad has a density of 20 fins per inch (FPI) and 12 flow channels where the coolant will travel.
The build quality is spot on, with no imperfection to the eye nor touch.
The IceGem AIO 360 is using reinforced leak-proof 400mm long rubber tubes that are finished in an excellent nylon braided sleeves.
We saved the best for last! This - is - the - pump’s - top housing! Personally, we think that SilverStone nailed it here with the aesthetics with this diamond-cut/crystal design. It’s like they got the balance just right to match the theme with maximum eye-candy but also elegant.
When this lights up, you won’t need a Kaleidoscope anymore because you will be mesmerised of how cool it looks.
OK, OK, here’s a quick preview! You grab yourself a pair of G.Skill Trident-Z Royals in silver to match the IceGem and you are set.
Moving on, the tubes offer a decent amount of swivel.
Another key selling point here is the implementation of this full sized contact plate, worthy of the name ‘block’. It’s massive, at 70 by 53mm which will make sure it will grasps the full IHS of the famous Threadripper CPUs.
There’s no mirror finish but the machining is perfect, as you can see the circular pattern from the milling process.
Lastly, the pump’s housing is made from ABS and it’s 76 mm tall. The pump is rated up to 3000 RPM and it also has a pair of cables just like the fans; one 50mm long 3-pin power plug and one 510 + 310mm long 4-pin proprietary connector/3-pin ARGB port. All of these will connect in series with the cables from the fans but more on that in the next chapter.
SilverStone states that the pump motor utilizes a three-phase, six-pole design for a smoother, quieter operation when compared to most single-phase, four-pole design. This will also improve the energy efficiency.
Before we being the installation sequence, this is how it looks with the fans installed.
Installation and RGB
We have recently upgraded our testing platform with a new case (next to be reviewed), motherboard and RAM but maintained the same CPU for longevity of the charts and results, thus the build is still centred around AMD’s AM4 socket.
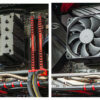
The first step, is to remove the stock Intel mounting bracket that comes preinstalled, if you plan to use the AIO on the AM4 socket for example.
After you decide where to install the radiator, then secure the fans onto the rad with the exiting wires facing the motherboard, for a cleaner wire management. Our case has a modular top plate which makes this installation a breeze. Thus secure the radiator with the included short Phillips screws.
Then take the universal backplate making sure that the AMD writing is facing you.
Apply the black divider onto the bracket and then install the securing back bolts making sure you select the appropriate AM4 holes. On top of those, slide in the black small washers.
Attach the assembly onto the motherboard and then on the other side, slide in the black spacers/dividers.
Apply the thermal paste and then just bolt down in an x-pattern the pump with the help of those spring-loaded screws.
As you can see, there is no clearance issue around the socket area and the exiting tubes have plenty of space to not interfere with the RAM slots.
Regarding the spaghetti junction, well it’s pretty simple if you look at the manual. We used the remote since our motherboard doesn’t have a 5v RGB port, only 12v. The fans connect into the Y-splitter that goes into the CPU_FAN port while the pump’s 3-pin goes into the AIO_PUMP header. Regarding the RGB, make sure you connect the AIO’s RGB proprietary plugs first into the remote, then followed by each fan, into the next one.
Now let’s enjoy the finished look. The AIO tubes have the perfect length, not to long to be hanging unnecessarily but not too short that it will not reach the socket.
Let’s fire up the RGB show ! No matter the ambient lighting condition, this will bring joy into your life.
Testing methodology
- The AMD Ryzen 7 1700 CPU will be tested at stock settings and then overclocked at 3.70 GHz for 1.325v
- As the main torture test, we will employ a 2 minute run in AIDA64
- Room temperature was recorded at ~ 18°C
- For the noise testing, we used our Pyle PSPL01 placed 30 cm away from the setup - all other fans will will be off or set at minimum RPM
- Thermal paste used - Noctua NH-H2
- We will compare the results to other CPU air coolers close to its price/performance bracket
- All CPU fans will be left on the ‘standard’ auto % rpm curve to simulate real life usage patterns and the case fans are set at the lowest RPM setting via the case’s control switch
- Any results over 90° C in any condition are considered a fail
Competition CPU Coolers:
- Noctua NH-U14S - 140 mm
- Noctua NH-D15 chromax.black - Dual 140 mm
- Noctua NH-U12A - Dual 120 mm
- Noctua NH-D15S chromax.black - 140 mm
- BeQuiet! Pure Loop 280 mm AIO - Dual 140 mm
- Alpenföhn Glacier Water 280 mm AIO - Dual 140 mm
Hardware used:
- CPU: AMD Ryzen 7 1700 AM4 - 8c/16t @ 65W TDP
- RAM 16GB DDR4 T-Force Night Hawk RGB 3000 MHz CL16
- Motherboard: ASUS ROG STRIX X370-F Gaming ATX @ BIOS 5220
- Boot SSD: ADATA XPG SX6000 128GB M.2 NVMe TLC
- Video card(s): KF2 GTX 480 Anarchy Accelero Xtreme Plus
- PSU: Seasonic S12II-620 Bronze
- Case: BeQuiet! Silent Base 802 Black
- Case fans: 3x BeQuiet! Pure Wings 2 140 mm
Software:
- OS: Windows 10 Pro x64 20H2
- GPU Drivers: NVIDIA GeForce WHQL 391.35
- Core Temp v1.16 - To see the temperatures in real time
- CPU-Z v1.95 - To verify the CPU’s statistics
- AIDA64 Extreme v6.23 - A popular total system stability test suite
- Cinebench R15 - Popular CPU benchmark
- Cinebench R20 - The new revised version optimised for the newer multi-core CPUs
- MSI Afterburner v4.62 - To record the FPS and load/temperatures
Resolution for our test game Rise Of the Tomb Raider, is set at 1920×1080 with everything at Medium quality settings and no AA.
Testing, Results and Analysis
Let’s start in order of CPU load difficulty. First up is the Cinebench R15 test. On the left we have the CPU in stock form while on the right we have it overclocked. Well, this was bound to happen, being our first AIO 360 in these charts, the IceGem 360 become the best performing CPU cooling solution that we have ever tested so far.
The Cinebench R20 is a more modern up to date multi core benchmark suite. So naturally we will see a bigger load and thus a larger temperature figure than the R15. The previous pattern is preserved here as well, as seen in R15.
In AIDA64 we isolated the stress test just for the CPU therefore we should get the highest stress scenario for the CPU but sometimes here we get a higher temperature for the stock settings vs R20 and lower values for the OC scenario. Still, nothing changes in the overall hierarchy.
Rise Of the Tomb Raider is a fantastic game and also a good testing title for both GPUs and CPUs. Still not as stressful as a synthetic torture test but a great indicator of real life usage. Since the game isn’t pushing the CPU as much as a synthetic benchmark, we get really good results.
Now for the noise levels tests. Since the load is divided between multiple fans, they don’t need to spin up that much. Nevertheless, the whole setup as in the pump and fans will become audible above 70% RPM which is perfectly normal.
Conclusion
There is a lot of competition nowadays in the AIO segment but SilverStone has managed to offer an excellent and complete package with the IceGem series. The 360 mm variant basically ticks all the boxes that you need when it comes to such a product: it offers an amazing cooling capability, then it’s highly versatile because it supports any socket you can think of (besides the LGA775) all the way to the mighty Threadrippers; the pump is one tier up when compared to most regular AIOs and then of course the maximum eye candy that comes from the elegant but very effective diamond/crystal design that resides on top of the pump. The build quality is top notch and having so much cooling headroom, of course it will offer a silent operation even at medium RPM loads. All in all, this is one amazing product !
The good:
+ Amazing cooling performance
+ Biggest contact surface available
+ One of the best looking RGB implementation for AIOs
+ Ability to connect the RGB to the motherboard or via the included remote
+ It supports basically all the modern sockets you can think of, sans LGA775
The bad:
- Proprietary ARGB cable connectors
Glob3trotters “Editor’s Choice” Award - 5 out of 5

Many thanks to Silverstone for supplying us with epic AIO !